How To: Make a Travel Map
Last week, I wrote a post about planning a trip itinerary. In that post, one of my tips was to make a travel map. Today, I wanted to share a little more about that. And how fitting that it's Columbus Day! Sharing a map-related tutorial on a holiday devoted to an explorer is so proper. Too bad Columbus was actually kind of a d-bag but hey, he did sail that ocean blue.
In the days before the convenience of making my own electronic maps, I would just pick up a paper map at the airport or city welcome center and then scribble on the sites I wanted to see. But in this paperless era, I've since switched to an easier, cooler way of mapping. Don't get me wrong, I still love paper maps and still grab one when I can (because phones eventually run out of battery) but because I love planning trips so much (seriously, it's like a fun hobby), I love making my maps ahead of time.
So, whenever I am planning a trip, as I'm researching cool sites and yummy eateries, I pin them on a map. I used to use the pinning features on Google Maps but recently, they switched over to a feature called My Maps. For a while, I hated it because there were a lot of kinks and flaws and Google gave the option to switch back over to the old user interface. However, it seems like they've responded pretty positively to all of the feedback and I'm actually really into it now.
 It's a pretty simple mapping tool but in case you're tech illiterate or you're just curious what I do to make my travel maps, I'll be sharing every step.
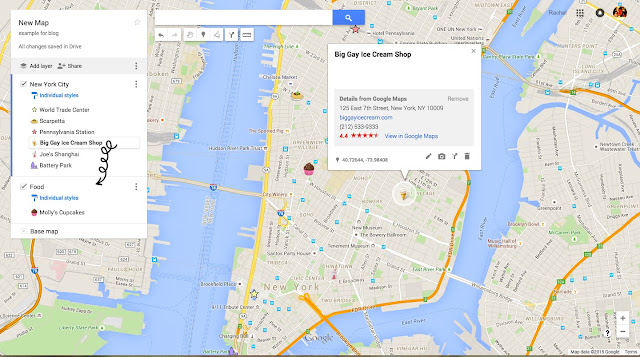
 Once you're on the My Maps page, you can create a new map, name it, and then start by working with your first layer. If you want to create several layers to start, you can click the 'add layer' button right at the top of the toolbar.

 To add a pin, you can type a place into the search bar. A lime green pin will appear (a single pin for a single, specific location or several pins for a generic search, e.g. for "pharmacy"). You can then click "add to map" for each pin you want to incorporate and the pin will become red (or whatever the default icon is set to). The other option for adding pins (perhaps if you need to pin an un-searchable location, e.g. a specific location within a park) you can click on the little bubble tool (just below the search bar) and manually drop a pin wherever you want.


 Once you've got your pin locked down, you can change the icon. There are several generic options available right from the get-go, but you can also click on "more icons" for some cuter options.

Google has provided a bunch of categories to choose from and for the most part, I like these icons and think they're cute.

 But, sometimes you may want to customize your map.
 For custom icons, I like to do a Google Image search. In this particular example, I looked up cupcakes. Then, I refined the search by looking for images in an icon size. Then, I picked one that had a "clear" background (you can also refine the 'color' option to 'transparent') and then found a cupcake I liked. If you don't choose a clear background, you'll end up with a little white box around the image. If you're okay with that though, then ignore my ramblings about transparent images.
 Copy the image URL and paste it into the bar at the bottom to add a new custom icon.


 If you want to get a little more aggressive with your mapping, you can also import maps that other people have generated. When you're looking at someone else's map, you can click the little three dot icon on the share bar and download the map.
 And then, back on your own map, you can import the downloaded map onto a new layer.


 And bam! Instantly, you've added multiple pins to your map.
 Once you've got a good number of pins and layers, you can start dragging and dropping layers and individual pins to organize them. This is an especially useful tool if you've mistakenly added a pin to the wrong layer; you can just drag it and drop it where you need it. By the way, the blue highlight along the left side of the layer shows which layer is active and any pins you add will go to that active layer. To activate a different layer, you just have to click on it and make sure the blue highlight changes.
In addition to adding pins, you can also add walking routes, driving routes, biking routes, or a line or shape of your choosing. This is great if you want to plan the route you want to take through the city on a particular day or to map out a fun walking tour you read about, whatever you like.
 The route options are simple. You just click where you want to start and move the cursor towards your destination and Google will automatically give you the most efficient route. If you want something more specific, you can click as you're drawing the line to make sure it "sticks" where you need it to.
 If you want to draw an unconventional route (say through the paths in a park) or if you want to draw shapes on your map (maybe to delineate good snorkeling areas in the ocean) it's just like any drawing tool. Click where you want and the line/shape will appear.
 You can also customize the color and line widths of these paths/shapes, which I find pretty handy. You can pick one color for walking, another color for biking, and a third color for driving.
 Another useful feature is the note and photo feature. Within each pin, you can clip in a photo (that you search online or import from your own photos) and you can jot down notes. The notes are helpful for things like reservations, admission prices, opening and closing times, etc. The photos are great for helping you recognize a location.

 Every map has a "base map" layer and in there, you can change the style of map to whatever you like. Sometimes it's nice to have the generic map, other times, you might want to see the satellite images.
 The little box next to each layer can be checked and unchecked to show and hide the layers.
 When you want to come back to a previous map, you can hit 'open a map' on the welcome page and you'll be given a list of maps you've created yourself, shared maps, recent maps, and starred maps. When you're editing a map, you'll notice a little star button to the right of the map's name (you can see it in the screenshot above) and if you click that, you star the map and it'll show up on your starred maps list. This is useful if you've got a long list of maps to scroll through and you have a few favorites you continually work with.

My Maps is also totally accessible on your phone. If you have an Android, you can download an app. If you have an iPhone, you can access the map through your web browser. It's annoying if you don't have data (like if you're abroad without a phone plan), but you can always screenshot what you need or run to a nearby Starbucks to snag some free wifi.
 So, to summarize, here are the key points and features I like to utilize when I'm making my map:
I hope this post was helpful. I'm off to play with the map H and I have for NOLA and my Grand Cayman map!
xoxo.
In the days before the convenience of making my own electronic maps, I would just pick up a paper map at the airport or city welcome center and then scribble on the sites I wanted to see. But in this paperless era, I've since switched to an easier, cooler way of mapping. Don't get me wrong, I still love paper maps and still grab one when I can (because phones eventually run out of battery) but because I love planning trips so much (seriously, it's like a fun hobby), I love making my maps ahead of time.
So, whenever I am planning a trip, as I'm researching cool sites and yummy eateries, I pin them on a map. I used to use the pinning features on Google Maps but recently, they switched over to a feature called My Maps. For a while, I hated it because there were a lot of kinks and flaws and Google gave the option to switch back over to the old user interface. However, it seems like they've responded pretty positively to all of the feedback and I'm actually really into it now.


Google has provided a bunch of categories to choose from and for the most part, I like these icons and think they're cute.


On the toolbar, there is a 'share' button. You can invite people to view your map and you can also invite people to help edit your map. Collaborative mapping is great. You can also embed your map onto a website. I have a few issues with the embedding tool: I wish you could "freeze frame" exactly what you wanted to embed and have the ability to share select layers only, but you kind of just have to share the whole friggin' thing. The old maps interface had these features and that's mostly why I miss them.


My Maps is also totally accessible on your phone. If you have an Android, you can download an app. If you have an iPhone, you can access the map through your web browser. It's annoying if you don't have data (like if you're abroad without a phone plan), but you can always screenshot what you need or run to a nearby Starbucks to snag some free wifi.

- LAYERS. Layers help if you have a really crowded map and you want to separate the pins by category. For example, you can have a layer for sightseeing, a layer for eateries, a layer for metro stations, etc. Layers also make it much easier to browse through the pins list if you're looking for something specific and you check and uncheck layers to show and hide them. I'm really hoping that in the future, Google will allow for nested layers so you can have a map for US travels with a layer for a specific state and then within that state layer, a layer for a specific city, and then layers within the city layer for food, sightseeing, etc.
- CUSTOM ICONS. As easy as it would be to just be a lazybones and go with the default icons, changing the icons makes the map visually pleasing but also more practical. If you're standing in a neighborhood and looking for a nearby dining option on your map, it's a lot easier to pick out a little fork-and-knife icon than it is to weed through a dozen pins that look the same.
- IMPORTING OTHER MAPS. If someone has already done the work for you, then why not take advantage of that? The beauty of My Maps is that you can import maps. So, if someone has already plotted out a city bike share, metro station stops, or even every Starbucks location, then download the map and import it into yours. It'll go into its own layer (which is super convenient) and it'll take seconds instead of hours. I used this feature when I was planning my trip to Cinque Terre. I found that someone had already created a map of the hiking trails between the cities so I downloaded it and added it right onto my map.
- DRAG & DROP. This is a feature that wasn't available when this tool was first released but I'm so glad it works now. When I'm creating my map, I add items in rather haphazardly and then once I've got a collection of pins, I like to start organizing them. This tool is great for when you're on the go and looking at your map from a mobile phone. You can easily peruse the list of pins (which maybe you've organized alphabetically or by neighborhood).
- ADDING NOTES & PHOTOS. This is an especially great feature if you're visiting a really dense city (dense in terms of the amount of cool things to see and do) and you've pinned a lot of stuff. You can add notes regarding opening and closing times of museums, you can add a photo of the restaurant facade if it's a place that's kind of hard to find, you can jot down if you've made a reservation, admission ticket prices, etc. It's so useful and it's a great tool to help you keep track of what you're doing.
- DRAWING PATHS. If you're like me and you're not a huge fan of doing tours, this is a really helpful feature. If you find a self-guided walking tour that you like, you can plot out the route on your own map. And of course, you can add pins along the path of places you need to stop and peruse.
- SHARING. My favorite feature is the sharing feature. You can invite other people to look at and help you edit your maps. My friend H and I always do this for trips we're taking together and it's a lot of fun. It's especially fun when you're both editing it at the same time and you refresh the map and see all of the places the other person has pinned.
- ON THE GO. My Maps is easily accessible on mobile phones and I think it looks a lot cooler to be scrolling around on a phone than it does to unfold a giant paper map in the middle of a touristy area but hey, that's just me.
I hope this post was helpful. I'm off to play with the map H and I have for NOLA and my Grand Cayman map!
xoxo.
This comment has been removed by a blog administrator.
ReplyDeleteGreat read! A DIY travel map is such an inspiring way to track adventures and stay motivated to explore!
ReplyDelete